 Aim
Aim
Learning to use the microscope.
Culturing a microorganism to study it, using compound microscope
Class level : 8th grade;12or 13 year olds.
Materials needed :
A small quantity of pond water; Hay; A saucepan; 1L beaker; Tripod with wire gauze; Bunsen burner; tongs; dropper.
Procedure :
Read the instructions given on how to use a compound microscope and become familiar with its part and function. Microscopes are sensitive equipments and need to be handled with care.
STEP 1:
Look for a pond and collect a test tube full of water. Ensure that the pond from which you are collecting water has life-forms in it. Usually there are aquatic plants, snails and fishes that can be seen with the naked eye. The green colour of the pond water is due to the presence of algae. If there is a lot of pond scum then slightly move the scum and collect the water. This pond water is your culture. Any material that contains the organisms you want to grow and study constitutes a culture. Collect at least three samples from different areas of ponds. Let one of the sample be collected from that part of the pond where there are a lot of plants. ( aquatic plants )
STEP 2:
Paramecium and other ciliary protozoans can be commonly found in stagnant pond water. Therefore first check to see what kind of organisms are seen in the sample you have collected.
- Take a drop of the pond water and place it on the glass slide.
- Set your microscope ready for viewing the slide under the low power
- Low power means use the 10 x objective lens to view the slide.
- Place the slide on the stage and secure it with the clips.
- View through the eye piece and slowly lower the body tube so that you can see the organism in the water. If you see several oval shaped creatures darting here and there, then you can be sure that there are enough organism there for culturing. There can also be several algae, but we shall concentrate on protozoans in this lesson.
STEP 3:
Fill the aluminium ( or stainless steel) saucepan with water. Put the hay into it. A handful of hay in a 1.5 L of water would be enough. Light your burner, keep the tripod and place the saucepan over it and heat the water-hay mixture. Let the water continue to boil for 5 minutes; the water would get reduced to a little less than a litre. Now put off the burner. Remove the saucepan and leave it covered till the water cools down. When the water is warm ( Not hot please note), transfer this mixture ( with the hay) into the beaker. Add your culture( pond water) to this mixture. Stir it gently but thoroughly with a small glass rod. Cover it ( don’t make it air tight) and leave it for a couple of days.
STEP 4:
After two days, check the culture. Once more with the help a dropper take a drop of water from your culture and place it on the glass slide and observe it under the microscope.
If you have cultured well then you will be able to see fairly big sized paramecium moving about. You are likely to see several of them. Depending on the kind of microorganisms that you collected from the pond you are also likely to see other protozoans such as Vorticella. Look at the diagrams given below. Are you able to see them? If you are unable to see them clearly under the lower power of the microscope then you must prepare the slide to see it under the higher power of microscope. Watch them live and record your observations.

Look up the following site to see some cool photographs of ciliates ( protozoans that have cilia- eg paramecium) You can also see images of other protozoans in this site. You may be able to see similar species in your pond culture.Use the information at this site to answer some of the questions given here.
How to prepare a slide and see it under the high power of the microscope?
- Place a drop of water over the glass slide
- Gently place a cover slip over this water.
- Make sure that there are no air bubbles between the coverslip and the glass slide.
- Now place it over the stage of the microscope and first focus it under the low power of the microscope. Make sure the clips are securely holding the slide.
- Once you are able to see the a organisms under the low power, gently turn the nose piece so that the objective lens with higher magnification ( 45X or 60X) clicks in place.
- Viewing through the eye piece, use the fine adjustment screw to bring the organisms under focus.
- Since the lens would be very close to the slide, use only the fine adjustment screw to focus, otherwise the cover slip may break, damaging the lens.
If you continue to observe these organisms then you can also see their behavior, see them reproducing. One of the process by which a paramecium divides is by fission.
 This figure is that of a Vorticella dividing. The way a vorticella moves is quite different from that of paramecium. Did you notice that parameciums are free moving protozoa, where as the Vorticella is generally attached to a substratum. Protozoans may be freeliving, found as single or in colonies and some like the Plasmodium are parasites. These unicellular organisms are also called as Protists and are classified under Phylum Protozoa. Amoeba is the most commonly studied protozoan. Along with Algae these are classified under the Kingdom Protista.
We have mostly talked about protozoans here. However, it is quite possible that your culture may have also had several types of algae. Did you see any of them grow in the hay culture? More about them later.
So what have you learnt at the end of this activity?
Test yourself.
- Which of the underlined word/s in the following are example/s of a ‘culture’?
- A spoonful of curd added to milk for making yoghurt
- Baking powder added to the maida dough for making Batura
- Sugar syrup added to lime juice and water.
- Why should the pond water be added only after the hay-water infusion cools down ?
- Would the paramecium grow if the hay and water were not boiled for sometime?
- What adjustments can you do to the microscope to view these organisms more clearly?
- Describe the movements of paramecium as seen under the microscope .
- Sketch the organisms observed under the microscope.
- Did you see any algae?
- How can you identify them to be algae?
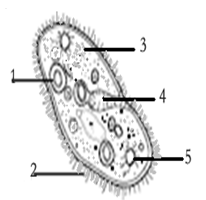
- Given along side is a diagram of paramecium.

- Mark the parts 1-5.
- Part 5 is responsible for osmoregulation .What exactly does it do? Which part in out body can be compared to this structure?
- What is the right term to describe structures 2 and 4? Organ or organelle? Why?
- The microscope has a part called diaphragm. Try looking at the slide with paramecium with diaphragm in different stages of closure- How did the paramecium appear when-
- Diaphragm was fully open ; diaphragm 50% open; diaphragm open only slightly.
- How much difference does the light make in being able to see the objects under the microscope? Is bright light always the best way to see objects under the microscope?
- Describe in correct sequence procedure for setting the microscope ready to view objects.
Reading material for students to refer
On Microscopes & protozoans
Some of the most interesting organisms one studies in the biology class cannot be seen by the naked eye. Microscopes helped discover the world of microorganisms. Although all text books talk about the Dutch amateur lens grinder Antonie van Leeuwenhoek and his microscope, the credit for making the first one goes to two Dutch eyeglass makers Zaccharias Janssen and his son Hans(1597); there was the famous Robert Hooke who too made a compound microscope around 1655; Leeuwenhoek’s microscope in 1670 finds mention in all historical anecdotes because, he not only made one, but was the first to study the microscopic life, using it. He viewed several cells such as sperm and blood cells, organisms such as bacteria and protozoans and coined the term ‘Animalcule’ for these microscopic ones. He did not stop with the first one but continued to make several more, some of which have survived till today.
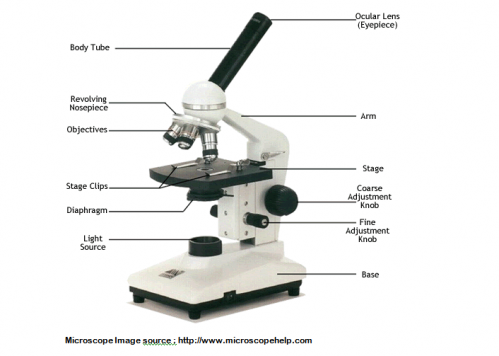
Parts of the microscope: This is a light microscope, the light falling on the specimen helps in magnification and resolution.

The functions of these parts are as follows :
- Ocular lens : Objects kept on the stage are viewed through this lens.
- Body tube : Serves to hold the eye piece and objective lens and helps to move the lenses for focusing correctly
- Revolving nosepiece : Holds different lenses
- Objective lens : These lenses help magnify the object.
- Stage : Place where the glass slides or petridishes are placed with specimens
- Stage clips : holds the galss slide in place
- Diaphragm : Permits light from the source to fall on the object placed on the stage.
- Coarse adjustment knob : Serves to move the body tube up and down in order to bring the specimen under correct focus
- Fine adjustment knob : Used for focusing objects under higher magnification.
How to get the microscope ready for viewing the objects-
- First ensure that the objective lens and eye piece are in line with one another. This is done by rotating the nose piece gently so that the objective lens falls into the groove. A ‘click’ sound indicates that the objective lens is in place.
- Next open the diaphragm fully.
- If there is a lamp at the part marked light source then switch on the light source and ensure that when you see through the eye piece there is bright light visible.
- Some microscopes have a lens in place of the light source. In such cases adjust the lens such that natural light is reflected through the diaphragm on to the stage.
- Lower the body tube completely. Make sure that you start working with 10 x objective lens and not the 45X or higher.
Now your microscope is set for viewing.
- Keep the slide with the object on the stage and secure its edges with the clips.
- Look through the eye piece and slowly raise the body tube, using coarse adjustment screw. When the object begins to be seen,stop moving the body tube. Use the fine adjustment knob to focus further such that you are able to see a sharp image.
Now that you know the steps to set up and use the microscope, use it to discover the world in small sizes.
Today microscopy has advanced to great heights. We have the Stereo microscope, Phase contrast microscope, Electron microscope, The atomic force microscope, Scanning probe microscope and Scanning Tunneling Microscope. The Electron Microscope was invented in 1933, but the scanning tunneling microscope is more sophisticated than EM.
Here is another diagram of the microscope. Draw it in your notebook and mark the parts. Try to do it without consulting the diagram above. That will let you know the extent to which you can remember the parts of the microscope.

You have used the microscope to view some organisms that were found in the pond water. You cultured them so that they grew and you could observe their parts and their activities more clearly.
Protozoans are unicellular, which means that they are made up of only one cell. Can you think of any other group of organism that are made up of only one cell? Well Bacteria are also unicellular. The single cell holds within it many of the parts that are seen in an animal cell. Like every cell they have cytoplasm and nucleus. Other organelles such as mitochondria can also be seen. Will their nucleus contain DNA? Yes it will, as the DNA contains the chemicals called genes that are needed for the very existence of the animal. Paramecium has two nuclei, a bigger macro nucleus and smaller micronucleus.
Some parts seen inside these cells are not commonly seen in animal cells. Like for example the vacuoles- there are two types of vacuoles seen in paramecium- food vacuole and contractile vacuole. Were you able to see food vacuoles? In order to see some of these parts, scientists use chemical dyes. This process is called staining. For example a chemical substance called Carmine powder can be used to observe food vacuole. Take some of your culture in a petri dish and add a drop of carmine Solution in it. The carmine enters the food vacuoles and stains it green. Now when you see the paramecium under the microscope you can actually see what happens inside. This is an interesting activity you can undertake to do, if your school lab has carmine powder.
You can then observe to see if the paramecium is feeding, how many vacuoles are formed and what happens to them. Paramecium has a funnel shaped channel called the gullet. There are cilia present in the gut too. By the combined action of the cilia over the body and the cilia of the gullet food such as bacteria are drawn into the gullet. These then move into the cytoplasm of the animal as a food vacuole.The digestion takes place inside the food vacuole and the undigested materials are thrown out from the vacuoles to the outside. You
The contractile vacuole serves to remove the water that is constantly entering into paramecium ( why?)
Did you notice small hair like parts all over the paramecium’s body, gently swaying as the animal moved. These are cilia and they help the paramecium to move. In the world of protozoans different kinds of structures can be seen for locomotion. In amoeba there is the pseudopodia, in Euglena there is flagellum.
Do you know that paramecium has a nick name? It’s called slipper animalcule? Can you guess why?
So there is a whole lot of animals and plants that can be seen under the microscope. If you have the patience and time to continue to see them, then you would also be able to see how they multiply in number.
For more on protozoans look up the : http://www.microscopy-uk.org.uk/mag/indexmag.html?http://www.microscopy-uk.org.uk/mag/wimsmall/sundr.html
For more activities with microbes look up the site: http://www.microbeworld.org/resources/experiment.aspx
Do remember that the names of the species given on these sites may or may not always be the ones that are seen in our country.


thanks